
Ankush Ananth Bhat
10 May 2026
The Authorization Problem Most APIs Eventually Face
Authentication tells you who a user is.
Authorization tells you what they're allowed to do.
Many Express.js applications start with something like:
if (user.role === "admin") {
  // allow access
}
A few months later:
if (user.role === "admin" || user.role === "manager") {
  // allow access
}
Then comes:
- Different permissions per module
- Multiple roles per user
- Temporary access grants
- Resource ownership rules
Before long, authorization logic is scattered across dozens of routes.
This is where Casbin shines.
Casbin is a powerful and flexible authorization library that allows you to manage access control policies separately from your application logic.
Combined with JWT authentication, it gives you a scalable RBAC system that can grow with your application.
What We'll Build
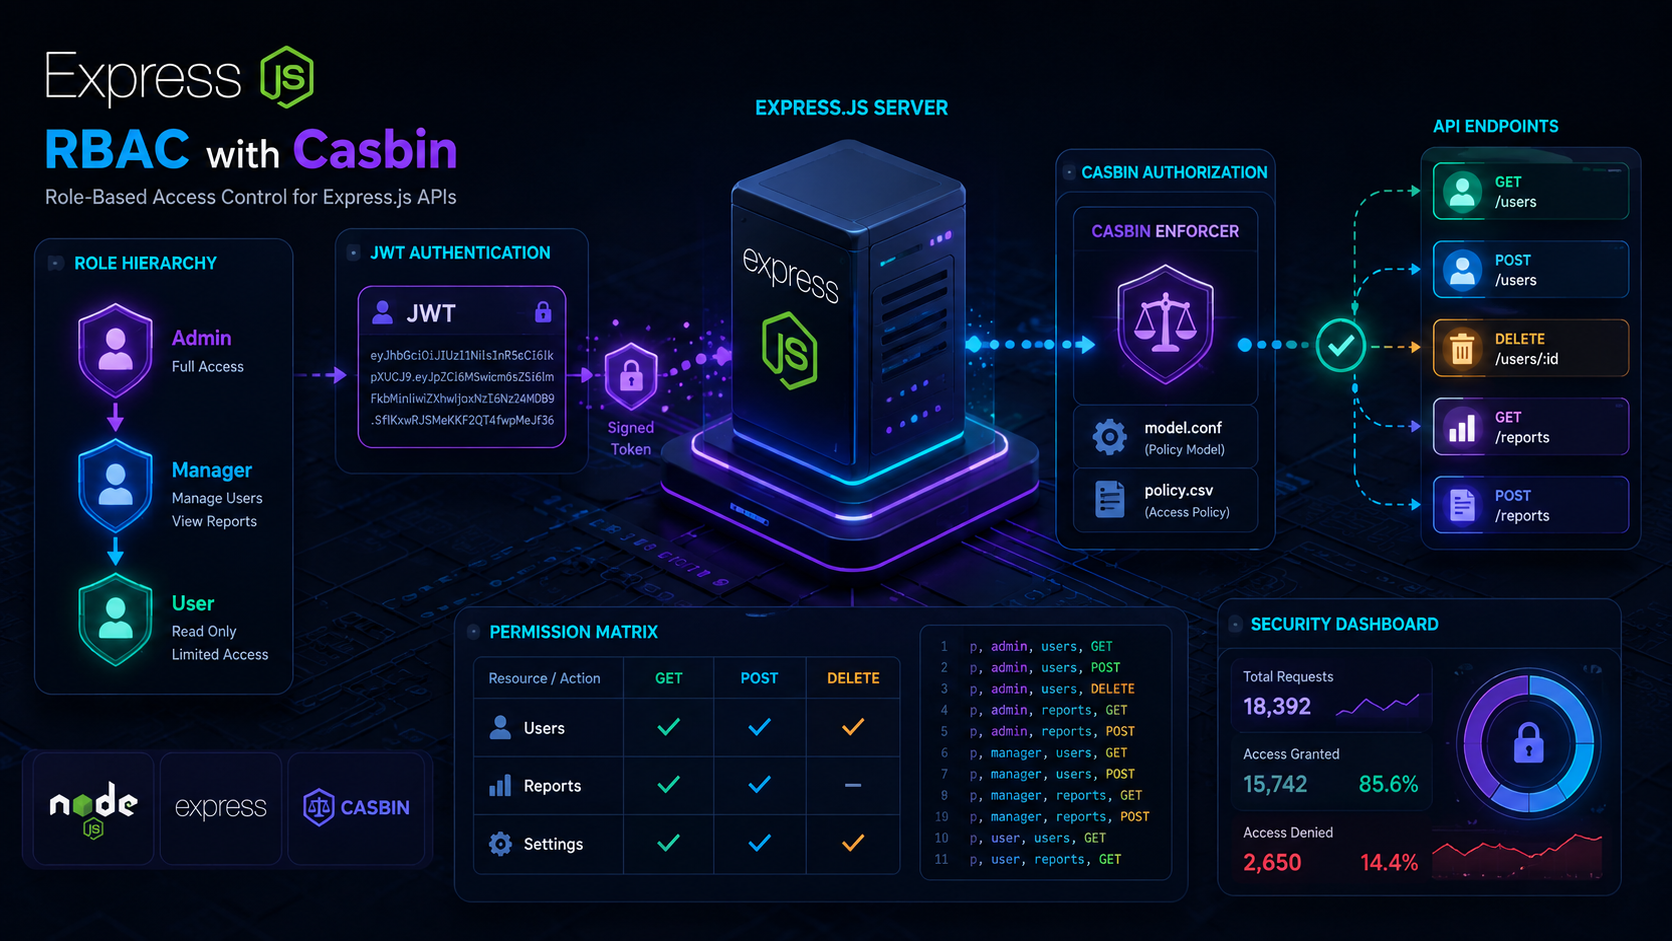
We'll create a system with three roles:
| Role | Permissions |
|---|---|
| Admin | Full access |
| Manager | Manage users and reports |
| User | Read-only access |
Protected endpoints:
GET    /users
POST   /users
DELETE /users/:id
GET    /reports
POST   /reports
And access control like:
| Role | GET Users | POST Users | DELETE Users | Reports |
|---|---|---|---|---|
| Admin | ✅ | ✅ | ✅ | ✅ |
| Manager | ✅ | ✅ | ❌ | ✅ |
| User | ✅ | ❌ | ❌ | Read Only |
Installing Dependencies
npm install express jsonwebtoken casbin dotenv
Project structure:
project/
│
├── middleware/
│   ├── auth.js
│   └── authorize.js
│
├── casbin/
│   ├── model.conf
│   └── policy.csv
│
├── routes/
│   └── users.js
│
└── server.js
Step 1: Create the Casbin Model
Create:
casbin/model.conf
[request_definition]
r = sub, obj, act

[policy_definition]
p = sub, obj, act

[role_definition]
g = _, _

[policy_effect]
e = some(where (p.eft == allow))

[matchers]
m = g(r.sub, p.sub) &&
    r.obj == p.obj &&
    r.act == p.act
This defines:
- Subject → User role
- Object → Resource
- Action → HTTP method
Step 2: Define RBAC Policies
Create:
casbin/policy.csv
p, admin, users, GET
p, admin, users, POST
p, admin, users, DELETE

p, admin, reports, GET
p, admin, reports, POST

p, manager, users, GET
p, manager, users, POST

p, manager, reports, GET
p, manager, reports, POST

p, user, users, GET
p, user, reports, GET
This file becomes the single source of truth for permissions.
Step 3: Configure Casbin
Create:
// casbin/enforcer.js

const { newEnforcer } = require("casbin");

let enforcer;

async function initCasbin() {
  enforcer = await newEnforcer("casbin/model.conf", "casbin/policy.csv");
}

function getEnforcer() {
  return enforcer;
}

module.exports = {
  initCasbin,
  getEnforcer,
};
Step 4: JWT Authentication Middleware
Create:
// middleware/auth.js

const jwt = require("jsonwebtoken");

module.exports = (req, res, next) => {
  const authHeader = req.headers.authorization;

  if (!authHeader) {
    return res.status(401).json({
      message: "Unauthorized",
    });
  }

  const token = authHeader.split(" ")[1];

  try {
    const decoded = jwt.verify(token, process.env.JWT_SECRET);

    req.user = decoded;

    next();
  } catch {
    return res.status(401).json({
      message: "Invalid token",
    });
  }
};
JWT payload:
{
  "id": 1,
  "email": "admin@example.com",
  "role": "admin"
}
Step 5: Authorization Middleware
Now let Casbin decide who can access what.
// middleware/authorize.js

const { getEnforcer } = require("../casbin/enforcer");

module.exports = (resource) => {
  return async (req, res, next) => {
    const role = req.user.role;

    const allowed = await getEnforcer().enforce(role, resource, req.method);

    if (!allowed) {
      return res.status(403).json({
        message: "Access denied",
      });
    }

    next();
  };
};
Notice how no permission logic is hardcoded.
Everything comes from policy files.
Protecting Routes
const express = require("express");

const auth = require("../middleware/auth");
const authorize = require("../middleware/authorize");

const router = express.Router();

router.get("/", auth, authorize("users"), (req, res) => {
  res.json({
    message: "Users fetched",
  });
});

router.post("/", auth, authorize("users"), (req, res) => {
  res.json({
    message: "User created",
  });
});

router.delete("/:id", auth, authorize("users"), (req, res) => {
  res.json({
    message: "User deleted",
  });
});

module.exports = router;
The route remains clean and readable.
Generating JWT Tokens
const jwt = require("jsonwebtoken");

function generateToken(user) {
  return jwt.sign(
    {
      id: user.id,
      role: user.role,
      email: user.email,
    },
    process.env.JWT_SECRET,
    {
      expiresIn: "7d",
    },
  );
}
Example token users:
{
  id: 1,
  role: "admin"
}

{
  id: 2,
  role: "manager"
}

{
  id: 3,
  role: "user"
}
Going Beyond Roles: Permission-Based Access
Sometimes roles aren't enough.
You might want:
create:user
update:user
delete:user
view:reports
export:reports
Casbin supports this naturally.
Policy:
p, admin, user:create
p, admin, user:update
p, admin, user:delete

p, manager, user:create
p, manager, user:update

p, user, reports:view
Then check permissions directly:
await enforcer.enforce(role, "user:create");
This gives much finer control than simple roles.
Database-Driven Policies
Hardcoding permissions in CSV files works initially.
For production systems, store policies in:
- PostgreSQL
- MySQL
- MongoDB
- Redis
Using Casbin adapters:
npm install casbin-pg-adapter
Benefits:
- Dynamic permission updates
- Admin permission dashboard
- Multi-tenant support
- No redeploy required
Common Production Patterns
1. Role Hierarchy
g, admin, manager
g, manager, user
Admin automatically inherits manager permissions.
2. Ownership Rules
Allow users to edit only their own resources.
if (req.user.id === post.authorId) {
  return next();
}
Combine this with Casbin policies for hybrid RBAC + ABAC.
3. Multi-Tenant SaaS
Tenant A
 ├── Admin
 ├── Manager
 └── User

Tenant B
 ├── Admin
 ├── Manager
 └── User
Casbin supports domain-based RBAC for this use case.
Why Casbin Over Custom Middleware?
| Feature | Custom RBAC | Casbin |
|---|---|---|
| Role Management | Manual | Built-in |
| Permission Policies | Hardcoded | Centralized |
| Role Hierarchies | Complex | Native |
| Multi-Tenant Support | Difficult | Built-in |
| Database Adapters | Manual | Available |
| Maintainability | Medium | High |
For small applications, custom middleware works.
For growing systems, Casbin prevents authorization logic from becoming a maintenance nightmare.
Best Practices
Keep Authentication and Authorization Separate
Authentication:
Who are you?
Authorization:
What can you do?
Never mix the two concerns.
Store Roles in JWT
{
  "role": "manager"
}
This avoids a database lookup on every request.
Keep Policies Centralized
Avoid:
if(role === "admin")
inside route handlers.
Let Casbin handle permission checks.
Audit Permission Changes
Track:
- Who changed permissions
- When they changed
- What changed
Especially important for enterprise systems.
Wrapping Up
Role-Based Access Control is one of those things that starts simple and quickly becomes complex as your application grows.
Using Express.js, JWT, and Casbin gives you:
- Clean route handlers
- Centralized authorization policies
- Role hierarchies
- Fine-grained permissions
- Scalability for enterprise applications
Instead of scattering permission checks throughout your codebase, let Casbin become the single source of truth for authorization.
Your future self — and your teammates — will thank you.
Building APIs with Express.js? RBAC is one of the highest-leverage security improvements you can add early. Questions, feedback, or ideas? Drop an email at ankushbhataab@gmail.com.